Friday, June 30, 2017

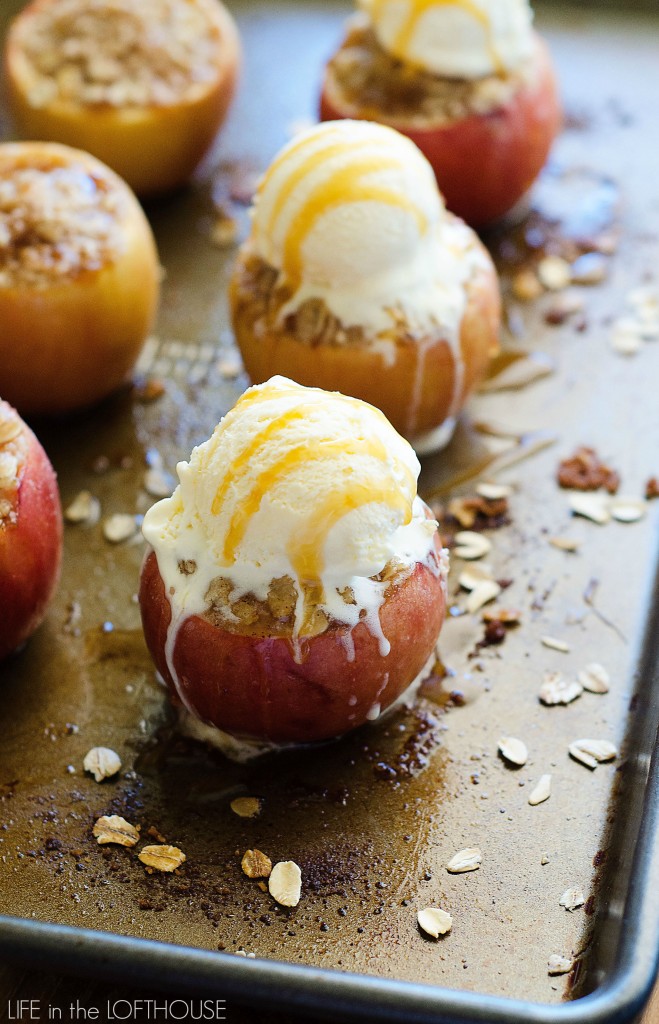
Apple Crisp Stuffed Baked Apples


For this recipe take a classic apple crisp and stuffed it inside Gala apples then bake them until the topping is golden and perfect. They turn out absolutely delicious and make a beautiful presentation too! They are incredible, especially topped with vanilla ice cream and caramel sauce!
From life-in-the-lofthouse.com.


Apple Crisp Stuffed Baked Apples
(Makes 6 servings)


Ingredients:

8 small GALA apples
4 tablespoons butter
1/4 cup light brown sugar
1/2 teaspoon ground cinnamon (if tolerated)

Crumble Topping

1/2 cup all-purpose flour
1/4 cup oats
1/4 cup light brown sugar
1/4 cup granulated sugar
1/2 teaspoon ground cinnamon (if tolerated)
4 tablespoons butter, chilled and cubed


Directions:

1. Preheat oven to 400° F.

2. Prepare the crumble topping: In a medium bowl whisk together flour, oats, brown sugar, sugar and cinnamon. Cut in the butter with a pastry knife, or two forks until mixture is crumbly. Set aside.

3. Peel and chop 2 of the apples. Add chopped apples, butter, brown sugar, and cinnamon to a medium sauce pan and stir over medium heat for 8 minutes or until apples are tender. Remove from heat.

4. Chop the tops off of the remaining 6 apples and use a spoon to scoop out the flesh. You don't scoop all of it out, just enough to make a "bowl" for the filling.

5. Fill scooped-out apples with the warm apple filling from sauce pan. Top with a generous amount of crumble topping.

6. Place stuffed apples on a baking sheet and bake for 10-15 minutes until crumble topping is crispy. Serve warm with vanilla ice cream and caramel sauce (without problem ingredients). Enjoy! ♥


Thursday, June 29, 2017

The Perfect Homemade Protein Shake


Research shows that post-workout protein intake can affect these gains in a positive way, but it’s also important to remember that after a workout your muscles stores of glycogen – essentially energy – will be depleted, so including carbohydrate in your post-workout recovery fuel is equally as important. Hydration also goes without saying, but unless your workout exceeds an hour, water will suffice until you have finished your workout.

Chia seeds have been dubbed “the runner’s food” because of their ability soak up to 10 times their weight in water, so they’re great for hydration, as well as being high in protein and packed with other nutrients. Peanut butter has a bad rep for being unhealthy because it is high in fat and calories, but it is also high in protein, so as long as your portion control/will-power is strong, then a tablespoon in your smoothie does no harm at all! Happy exercising! From jamieoliver.com.


The Perfect Homemade Protein Shake


Ingredients:

1 banana, peeled
150g low-fat natural yogurt (without problem ingredients)
100ml of semi-skimmed milk or dairy-free milk
1 tbsp peanut butter
1 tbsp chia seeds (if tolerated)
½ tsp cinnamon (or to taste), if tolerated


Directions:

Simply whizz all the ingredients together in a blender and drink right away!

As ever, remember that a balanced diet and healthy lifestyle will play a massive role in keeping your whole body in tip-top condition – these tips are specifically for all you super-sporty foodies who may require a little extra of the good stuff.


Wednesday, June 28, 2017

Minty Shakes


Adjust the milk to your preference, a little more for a thinner shake or less if you prefer a nice thick shake. Since green food coloring is a no-no for IC, the shakes will not be green like in the picture. You can make it green by DIY Natural Food Coloring or use organic food coloring without problem ingredients. I adapted this recipe from withablast.net to make it IC friendly.


Minty Shakes
4 Servings


Ingredients:

4 cups Vanilla Ice-Cream (without problem ingredients)
1 cup Milk {more or less to your preference}
1/2 t Peppermint Concentrate OR 2 t Peppermint Essence (without problem ingredients)
4 to 6 drops of DIY Natural Food Coloring or use organic food coloring without problem ingredients (optional)
Whipped Cream, to top (without problem ingredients)
Mint Leaves, to garnish


Directions:

1. Place the Ice-Cream, Milk, Concentrate/Essence and food coloring in a large blender or milkshake maker - blend until smooth - pour into 4 glasses.

2. Top with Whipped Cream and garnish with Mint Leaves.

3. Serve immediately.


Monday, June 26, 2017

Healthy Banana Cupcakes with Cream Cheese Frosting


These cupcakes look and taste fancy, just like what you’d buy from a bakery, but they’re much easier to make than you’d expect! The frosting can be made up to three days in advance if stored in the refrigerator in an airtight container, and the unfrosted cupcakes will keep for at least two days if stored in an airtight container on the counter. Once frosted, the cupcakes are best if eaten within 24 hours. From amyshealthybaking.com.

*Be sure to substitute ½ cup (120mL) of agave, honey, or pure maple syrup for the vanilla crème stevia. Two cream cheese frostings posted at the bottom of the recipe for you to choose from.


Sunday, June 25, 2017

Homemade Healthy Gummies


If you are concerned about IC, Homemade Healthy Gummies are the way to go. Did you know store bought gummies or fruit snacks are full of sugar, high fructose corn syrup and artificial dyes? Check out the labels! The long list of ingredients indicates the snack is not a healthy choice. They are so easy to make and you will feel great about giving your kids a super healthy snack too. These Homemade Healthy Gummies are made with real fruits and veggies, full of vitamins, minerals and essential nutrients! You don’t have to worry about high fructose corn syrup or dangerous artificial dyes anymore. Isn’t it great? Just whole fresh fruits and veggies. You can also get creative and add superfoods like chia seeds, ginger, probiotics, cod liver oil or kale to your blends.

A good quality Gelatin is very important. This is why it is recommended to use one made from 100% Pasture-Raised Beef. The collagen in this type of gelatin along with the many amino acids help regulate our metabolisms, have anti-inflammatory properties, strengthens hair and nails, and regulates hormones. Gelatin is also known to improve digestion.

From creativeandhealthyfunfood.com.


Homemade Healthy Gummies


Ingredients:

• 1 1/2 cups fruit and/or vegetable juice (ones that are tolerated), freshly made with a Juicer (cold press -best choice) or store-bought (making sure it is 100% juice and preferably not from concentrate). Smoothie blends are great too!

• 4 tablespoons gelatin (grass fed gelatin. A tablespoons is usually one gelatin packet, but just to be sure, empty the packets into a bowl and use a measure spoon.)

• 2-4 tablespoons Raw Honey depending on your preference and how sweet your juice is. You can also use pure maple syrup. If your juice has lots of veggies you will need more but it is up to your personal taste.

• 1/2 teaspoon vanilla extract, (recommended Organic Pure Vanilla Extract – optional for extra flavor)

• Any other ingredients you would like to incorporate like probiotics, elderberry syrup (to prevent or fight a cold, if tolerated), or cod liver oil (immune system booster). Remember you can make these gummies your natural multivitamins.


Directions:

1. Pour juice into a small-medium saucepan. Sprinkle the gelatin over the top and let sit for just a few minutes until it starts to “bloom” (it will get wrinkly looking on the surface and all of the white powder from the gelatin will absorb into the liquid). When all the gelatin is absorbed, mix it well.

2. Then place the saucepan over medium heat on the stove. Let the liquid warm, but don’t let it boil. You want all of the gelatin to dissolve and turn thin and runny (it will be grainy at the beginning but after a couple of minutes in the heat it should dissolve completely).

3. Add the honey, vanilla extract, and any other ingredients you will be using.

4. Put the liquid in a little jar (you can use a measuring cup) into a Loaf Pan or your fun gummy molds and refrigerate for about 2-3 hours. Some of my favorite molds are the Freshware 30-Cavity Silicone Mold, the Toy, Car, Block and Bear Chocolate, Gummy Mold and the kilofly Silicone Mold, Robot & Dinosaur

5. Remove from molds. They pop right out. If you used the loaf pan, cut your gelatin into small squares.

6. Keep your homemade healthy gummies in an airtight container in the refrigerator for about 2 weeks. If you leave them outside they will last but I recommend storing them in the refrigerator.

*Update. If you want to make smaller gummies, there are fantastic mini Gummy Bear Molds. They even come with a dropper for easy filling.


Ideas For Juice Combinations:

Red: beets, strawberries (if tolerated), carrots, raspberries (if tolerated), red apples (if tolerated)

Orange: carrots, oranges (if tolerated), clementines (if tolerated), mangoes (if tolerated), peaches (if tolerated)

Yellow: yellow pear, yellow apple (if tolerated), grapes (if tolerated), (DO NOT use pineapple juice, your gelatin will not set up due to the enzyme bromelain that’s found in pineapple).

Green: kale, spinach, peas, green grapes (if tolerated), cucumber, green apple (if tolerated), (DO NOT use kiwi, your gelatin will not set up)

Purple: purple cabbage, blackberries and blueberries (if tolerated)

If you want to change the colors and lighten up your homemade healthy gummies, you can also substitute some milk (dairy or non-dairy) for some of the juice in the recipe. You can also use almond milk.

Here are some other DIY Natural Food Coloring ideas that you might like to try.

Saturday, June 24, 2017

Coffee


Are you desperate for coffee? Is your IC preventing you from having coffee? There are options you can try. With active IC it is recommended that you slowly work your way up using mild stuff that we know that is going to soothe your bladder then slowly work up to things that might be a little more irritating.

Coffee and Interstitial Cystitis - Is it safe to drink? (Interstitial Cystitis Network)


Suggested Hot Drinks (slowly work yourself up)

1. Hot water or milk (steamers)
2. Herbal Teas (peppermint, chamomile)
3. Roasted Carob Teas- Roastaroma, Almond Sunset, English Toffee
4. Herbal Coffees- Pero, Cafix, Kaffree, Roma, Teecino (can be on the bitter side so be prepared to use a little bit of milk or cream)

If you do well with the above try:
5. Low Acid Real Coffees- Euromild or Puroast (decaf preferred first because caffeine will irritate the nerves in your bladder)


*Remember, if you are having any symptoms at all, go back to the hot water and slowly work yourself up.


Questions about Low Acid Coffee
From ic-network.com.

• Not every IC patient can and should drink even low acid coffees. If you have, for example, Hunner’s ulcers, severe petechial hemorrhaging in your bladder or are currently in a major flare, you should only be drinking water, milk, chamomile tea and/or peppermint tea until your bladder has the opportunity to heal.

• Patients whose bladders are in better shape may find low acid coffees to be tolerable if used in modest quantities.


How to make a low acid IC friendly coffee

1. Start with naturally low acid beans, roasted to a darker roast! We suggest trying a DECAF before trying regular coffee.

2. Use a cold brew coffee maker. The Toddy Cold Brew Coffee Maker ($37.99) uses regular coffee but reduces the overall acidity by 67% when compared to hot brewing systems by using a unique, patented cold brew system.

3. Taking the OTC supplement, Prelief, beforehand may reduce/neutralize acidity levels.

4. Start with a small amount to determine if your bladder tolerates it well!

5. Don’t go to excess. One cup of coffee a day is plenty for our more sensitive bladders and if you start having bladder discomfort again, stop immediately to avoid irritating your bladder further.


Friday, June 23, 2017

Coffee Milkshake


Combine low/no acid coffee with vanilla ice cream and what do you get? Heaven in a glass! Cold brewed coffee is the perfect low acid ingredient for this delicious coffee milkshake recipe. The cold brewing method reduces the acidity level and creates a flavorful, yet extremely smooth concentrate that is perfect for making ice coffee and coffee milkshakes. The resulting brew is much gentler on the bladder and your stomach.

NOTE: Not every IC patient can and should drink even low acid coffees. If you have, for example, Hunner’s ulcers, severe petechial hemorrhaging in your bladder or are currently in a major flare, you should only be drinking water, milk, chamomile tea and/or peppermint tea until your bladder has the opportunity to heal.

It's easy to make this recipe dairy free (Vegan) by substituting So Delicious Coconut Milk and So Delicious Coconut Milk Ice Cream.

From healthyicrecipes.com.


Coffee Milkshake


Ingredients:

1/2 cup cold brewed decaffeinated coffee concentrate (using a Coffee Toddy makes it easy)
1/2 cup Milk (try Coconut Milk Cream for a healthier, non dairy alternative)
Vanilla Ice Cream without problem ingredients (try Coconut Milk Ice Cream for a healthier, non dairy alternative)


Directions:

1. Mix ½ cup coffee concentrate and ½ cup milk in a blender.

2. Add 1/2 cup of ice and 3 scoops of vanilla ice cream.

3. Blend until smooth.

4. Pour into a tall glass.

*If you really want to be decadent, add some whipped cream and a light sprinkle of cocoa or carob powder.